"Rivets for dummies"
Rivet pliers
Specifications
Rivet diameter
Double action of a rivet
Rivet length and grip length
Some concrete examples of riveting case angle or casemaker extrusions
Which rivets do you need (overview table) for the construction of your flight case?
"Rivets for dummies"
First, for those of us readers who have never worked with rivets before. This is a brief explanation that falls under the heading "rivets for dummies". And that is certainly not meant pejoratively. It's a first time for everything, so at some point everyone who has ever built a flight case will have used a rivet for the first time. And he must have wondered how a rivet actually works. Hence this explanation.
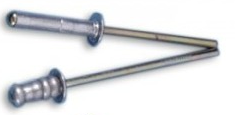
In this photo you see two rivets, in 2 different states. The top one is an unused rivet. You need riveting pliers to install a rivet. If you tighten the rivet with the riveting pliers (also called pop pliers), it will become shorter and thicker, like the bottom one in the photo. If you tighten even harder, the long, narrow pin of the rivet (the right part of the rivet in the photo) will eventually break off. You can simply throw those pins away with your metal waste after use.
Rivet pliers
In our webshop we sell 2 types of manual riveting pliers: a small one that you can operate with one hand and a large one that requires 2 hands. For the little one you really need quite a few muscles in your hand. The large one works a lot easier (because the lever is much larger), but it is of course a bit more expensive.
Professionals often use pneumatic riveting pliers. They are a lot more expensive. They work on air pressure. You will need a compressor to connect to.
Specifications
If you want to build a flight case and if you are going to work with rivets, it is advisable that you understand the distinction between the length of a rivet on the one hand and the grip length of a rivet on the other.
As an example, we will take 2 different types of rivets for wooden panels from the Flightcase-brico.com range, with the corresponding specifications:
- 4,8 mm x 19,5mm rivet
- Diameter: 4,8 mm
- Length: 19,5 mm
- Grip length: 8,5 mm - 16 mm
- 4,0 mm x 9,5 mm rivet
- Diameter: 4,0 mm
- Length: 9,5 mm
- Grip length: 1 mm - 6 mm
Rivet diameter
The diameter of the rivet you wish to use determines the diameter of the drill bit with which you must drill the hole for that rivet. That is why we sell both 4.2 mm and 5.0 mm drill bits at Flightcase-brico.com.
For rivets with a diameter of 4.0, pre-drill with a 4.2 mm drill bit. For rivets with a diameter of 4.8 mm, pre-drill with a 5.0 mm drill bit. Note that the drill bit is always 0.2 mm wider in diameter than the rivet. This is mainly because we want to be able to push the rivet into the hole smoothly and without too much resistance. This does not really matter for wooden panels. But since we often go through metal in flight case construction, it is more important to have a little bit of play.
Double action of a rivet
For the rest, it is important to understand that our rivets have a double effect. After you drill the hole, insert the rivet. Then you tighten the rivet with riveting pliers. This ensures that you pull the pin out of the rivet. But also that the rivet becomes shorter (in length) and thicker (in diameter).
The double action of a rivet is as follows:
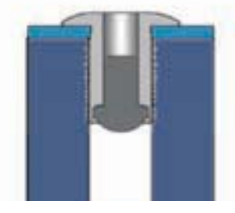 |
Part 1 of the operation The rivet clamps itself in the hole itself: because the rivet becomes shorter and thicker, it clamps itself on the side walls of the drilled hole. |
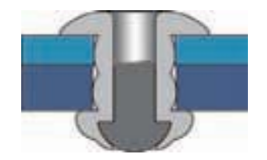 |
Part 2 of the operation The rivet grips along the back of the sheet material: if the sheet material is not too thick (or better said: if the grip length of the rivet is large enough), the rivet can thicken and form a ball behind the sheet material. |
Rivet length and grip length
The length of the rivet determines how deep the drilled hole must be in order to place the rivet. The grip length of the rivet determines whether the rivet will also stick to the back (part 2 of the operation) and form a ball there.
Wooden sheet material
If you work with the standard birch plywood flight case wood from Flightcase-brico.com, then part 1 of how a rivet works is sufficient in most cases. This sheet material is strong and solid enough in itself, so part 2 of the rivet's operation is not necessary for most applications.
An exception may be the attachment of recessed handles. Because the forces on the rivets of recessed handles become very great in heavy flightcases, it may be advisable to ensure that you use part 2 of the rivet's operation. You must therefore ensure that you use rivets with a grip length that is equal to or greater than the total thickness of the material to be bridged (handle + wooden sheet material + ring plate).
The large recessed handle consists of 3 mm thick material. The standard flight case wood is 10 mm thick. The ring plate is 1 mm thick. The total thickness to be bridged is therefore 14 mm. If we want to apply part 2 of the operation (which we certainly want if we want to use the ring plate), then we need a rivet with a grip length of at least 14 mm. Of the above 2 rivets from our example, the rivet of 4.8 mm x 19.5 mm is sufficient, because it has a grip length of 8.5 mm to 16 mm.
Plastic sheet material
When using our plastic sandwich panels, it is a different story. There is no material there for part 1 of the rivet's operation. After all, such a plastic flight case plate consists of a front and a back, but is otherwise largely hollow on the inside.
The shortest rivets will therefore usually suffice for plastic, because the rivet will then attach itself behind the outer plate (of the 2 sandwich plates) (only part 2 of the operation of the rivet, not part 1 of the operation of the rivet).
Here again: if you want a stronger connection, you can use longer rivets. If the grip length is sufficient, you can drill completely through and even put a washer over the rivet at the back before tightening the rivet. Then the rivet can grab behind that washer.
Because the "hollow" plastic panels are less solid than wood, we have rivets specifically for plastic in our range. These will break off faster (read: with lower resistance) during installation than the rivets for wood. This is to prevent the rivet from completely compressing the plastic sheet material. So make sure you choose the right rivet for the right application.
Some concrete examples of riveting case angle or casemaker extrusions
Which rivets do you need (overview table) for the construction of your flight case?