The information below applies to the use of wooden flight case panels of 10 mm thickness.
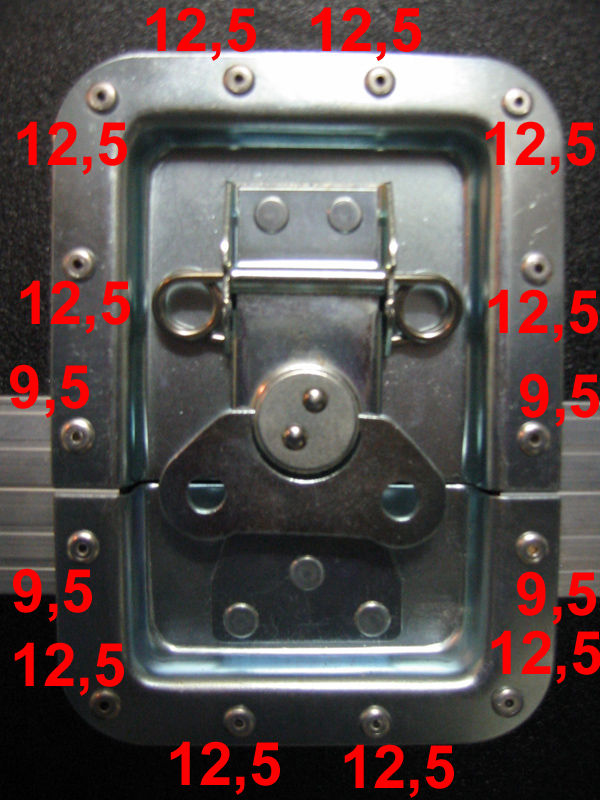
You always need short (4.0 x 9.5 mm) and long (4.0 x 12.5 mm) rivets. You use the short ones to put the parts on the lid locations of your case and the long ones for all the rest. See the photos below for an example.
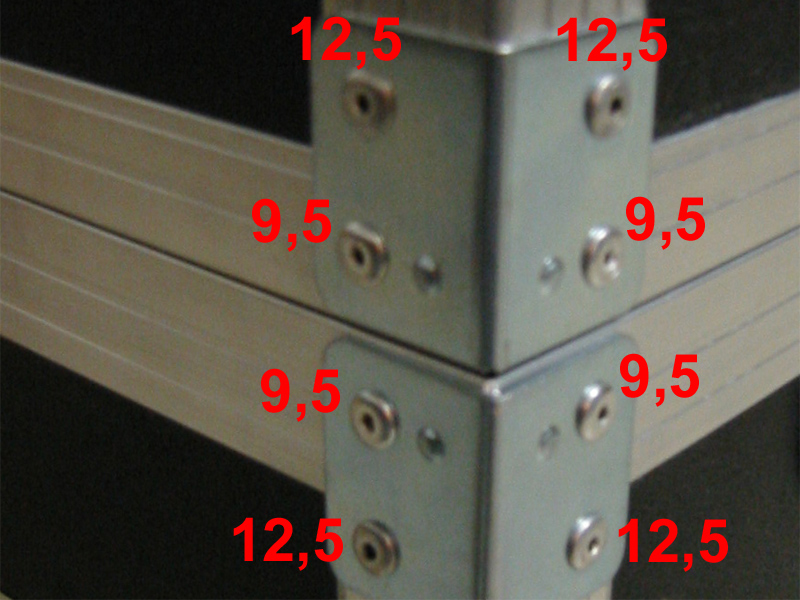
So always use long rivets to fix the case angles. You can also use them to put on the handles, at least where they don’t overlap with the lid locations.
Both short and long rivets are 4.0 mm in diameter, so you can use the same drill bit for both sizes. Always drill all the way through the wood for the long rivets. Use the short ones to put parts on the lid locations and drill through the outside of the lid location and the wood ‘in’ it, but not through the inside part of the lid location. This way it’ll stay nicely intact.
You can easily work out the number of rivets you’ll need with the list of flight case parts you’ll be putting on and the dimensions of the case you want to build. You’ll always need more rivets than you’d think at first sight. I’ll give you an example.
I’m going to calculate the number of rivets I’m going to need for the case in the step-by-step instructions. First up, make a list of all the parts that have riveting holes.
| Number of short rivets | Number of long rivets | |
| 8 large corner braces | 16 | 16 |
| 4 large ball corners and 4 large, stackable ball corners | 48 | |
| 4 large butterfly latches, with spring | 16 | 40 |
| 8 large heavy-duty handles | 104 | |
| 4 castor dishes | 24 |
Add to this the long rivets you need to fix the case angles. That’s another 64 for my case. So I end up with a total of 32 short rivets and 296 long ones. That’s quite a lot, isn’t it!
OK, I’ll admit that the flight case in my example has A LOT of parts. 8 handles, for example, is quite a lot. But don’t think this is really too much. The case will weigh about 60 kg once it’s got the equipment in it, so we’ll be carrying it with two people. And I find carrying heavy loads always easier with two hands, certainly because you don’t put asymmetric strain on your back that way. In certain circumstances it may also be necessary to hold the case in a different way. Hence the two handles on each side. Practice has taught me that this is not too much either.
For this particular example I also consistently used the large version of the butterfly latches, ball corners and handles. Of course you’ll use fewer rivets if you’re working with medium-sized parts, but I don’t think saving on the number of rivets should be a reason to work with medium parts instead of large ones. The decision to use medium or large is rather down to the size of your flight case and the way it’ll be loaded.
Longer rivets, namely those of 4.8 x 15 mm, 4.8 x 19.5 mm and 4.8 x 24.5 mm are also available in the flightcase-brico.com web shop. They’re not needed for normal flight cases, but only very special ones. They all come in a diameter of 4.8 mm instead of 4.0, so you need a 5 mm drill bit for them.
4.8 x 15 mm rivets are used, for instance, just as a replacement for the standard 4.0 x 12.5 mm ones, often in order to make the flight case even stronger, or just to give it an even tougher appearance. In the same way you can replace the 4.0 x 9.5 mm rivets with the larger and stronger 4.8 x 10.5 mm ones, i.e. to fix everything to the lid locations.
The 4.8 x 19.5mm rivets you can use to fit a recessed handle with a back plate, for example.